• ALL ABOUT ME
  • OUR HOME
  • ABOUT FAITH
  • CONTACT ME
  • DISCLOSURES
  • Nav Social Menu

    • Bloglovin
    • Facebook
    • Instagram
    • Pinterest
    • Twitter

  • DIY
  • Family
  • Home Decor
  • Encouragement
  • Organizing
  • Shop My Favorites

March 19, 2015 · 13 Comments

DIY Floating Mantel

DIY

Another addition in the Family Room Refresh!! A while back when I decided to paint the brick around our fireplace I also removed the mantel. It was never really my style. The fireplace sat naked for weeks, as I pondered what to put in it’s place. I toyed with the idea of building a surround, something tailored and traditional, or just a simple floating mantel.  My mind just kept going back to the latter, so that’s what we went with. And I’m soooo glad we did!!  I love it!!
 
DIY floating mantel


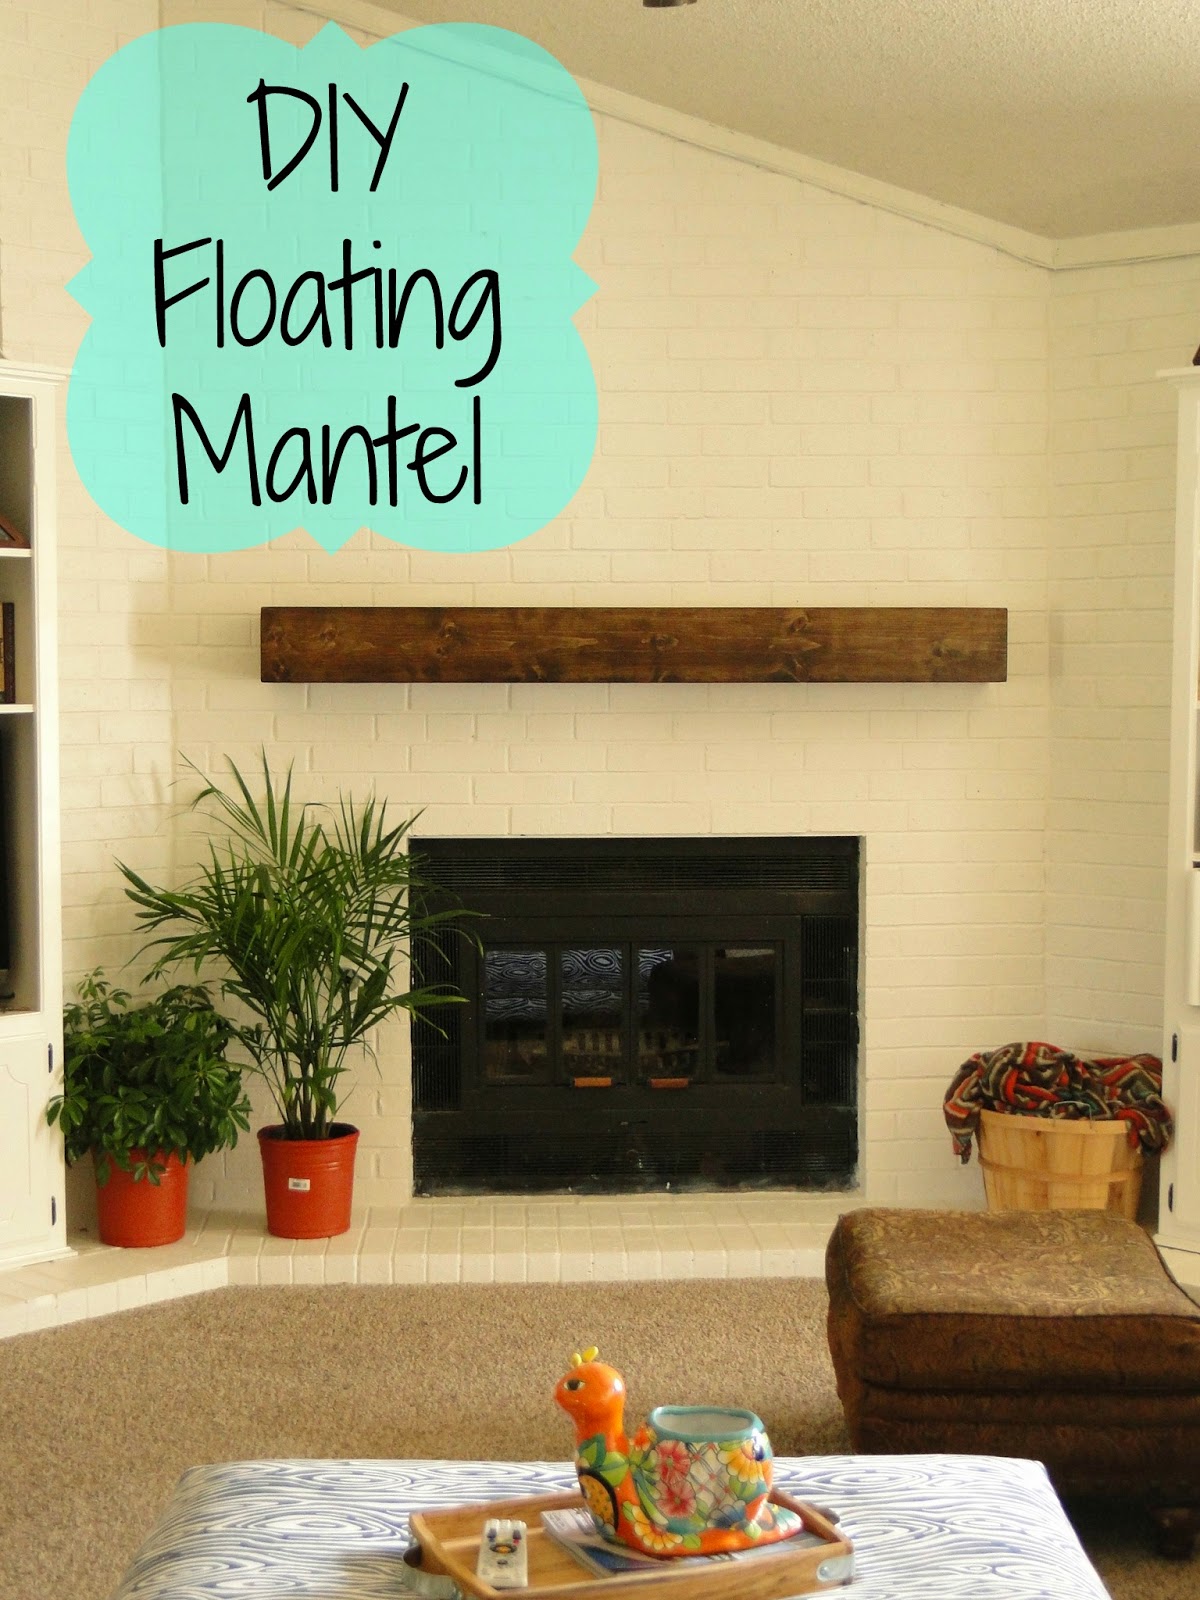
I had considered adding corbels, and I may still do that if I find some I love, but for now I love it as is!!
 
The DIY was not as hard as I thought it might be. Sometimes I can dive right into a DIY and get ‘er done, and other times I’m a bit intimidated.  I don’t know why, but some things get me psyched out!  
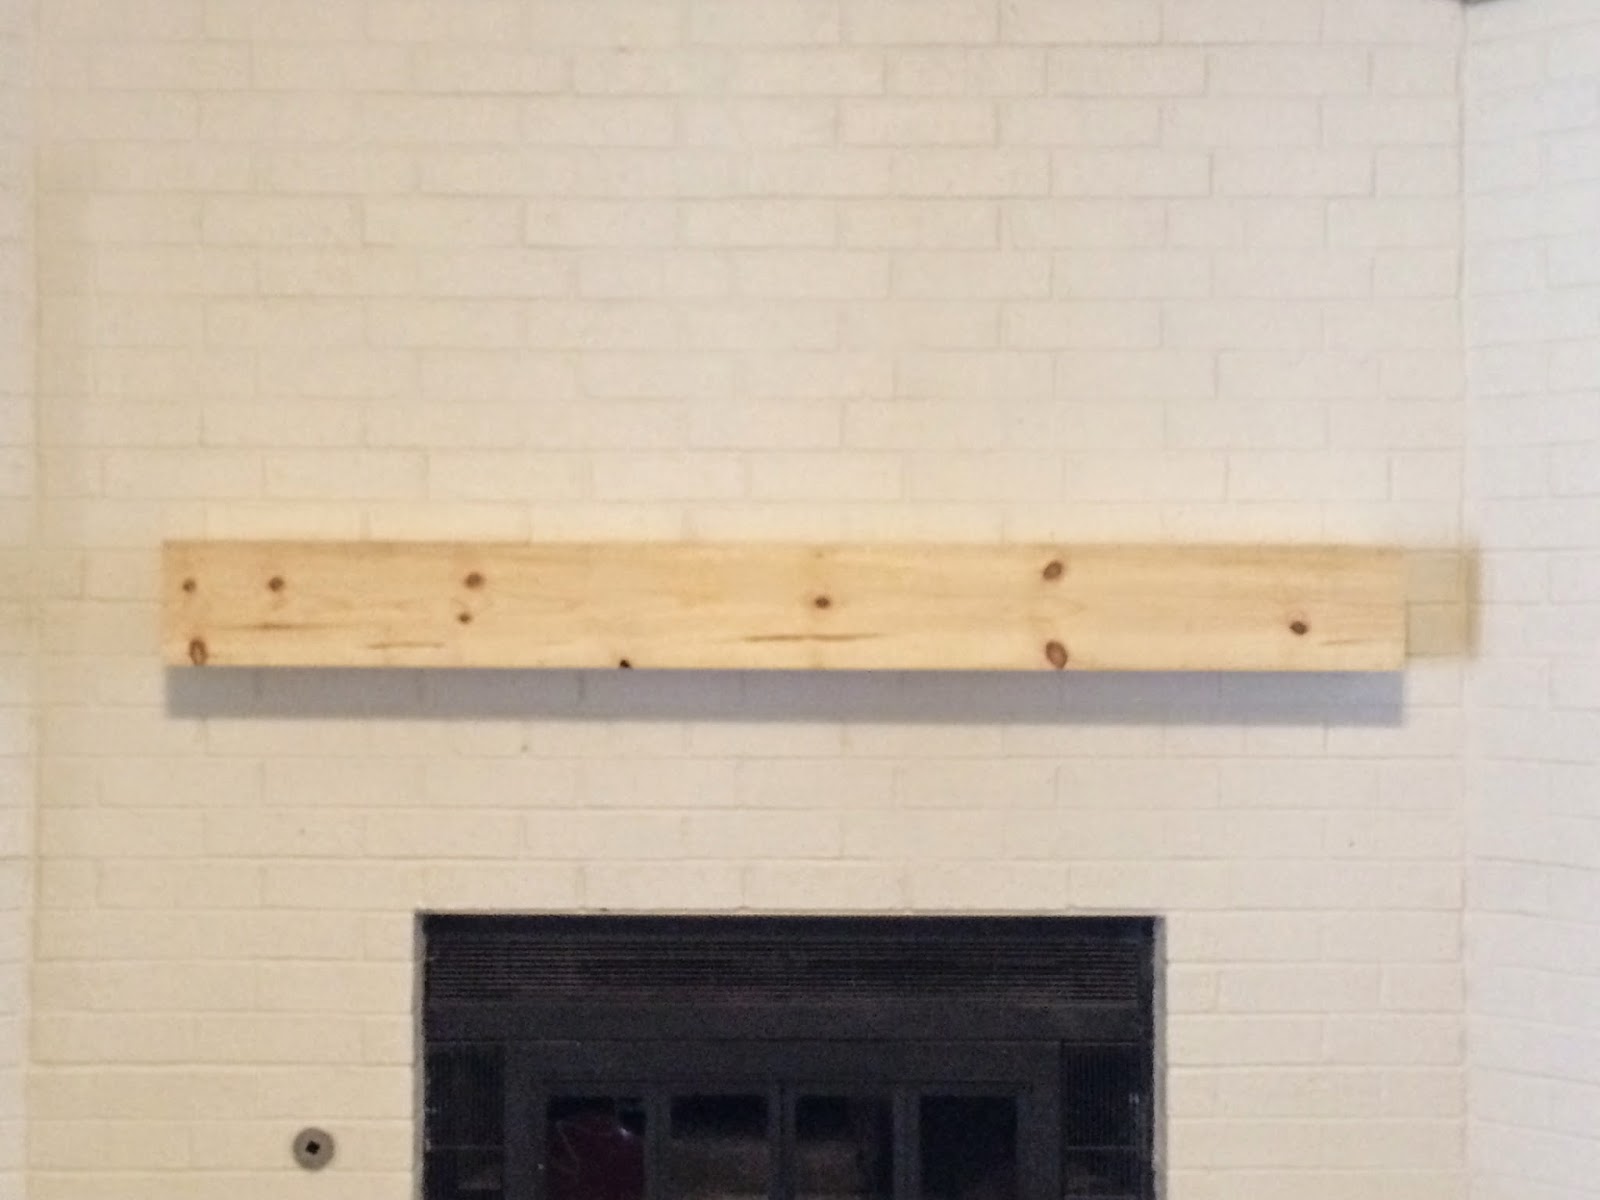
We started by attaching a ledger board to the brick.  We attached the appropriate anchors into the mortar in between the bricks, and then attached the board with screws.  
 
How to attach a floating mantel to brick
 
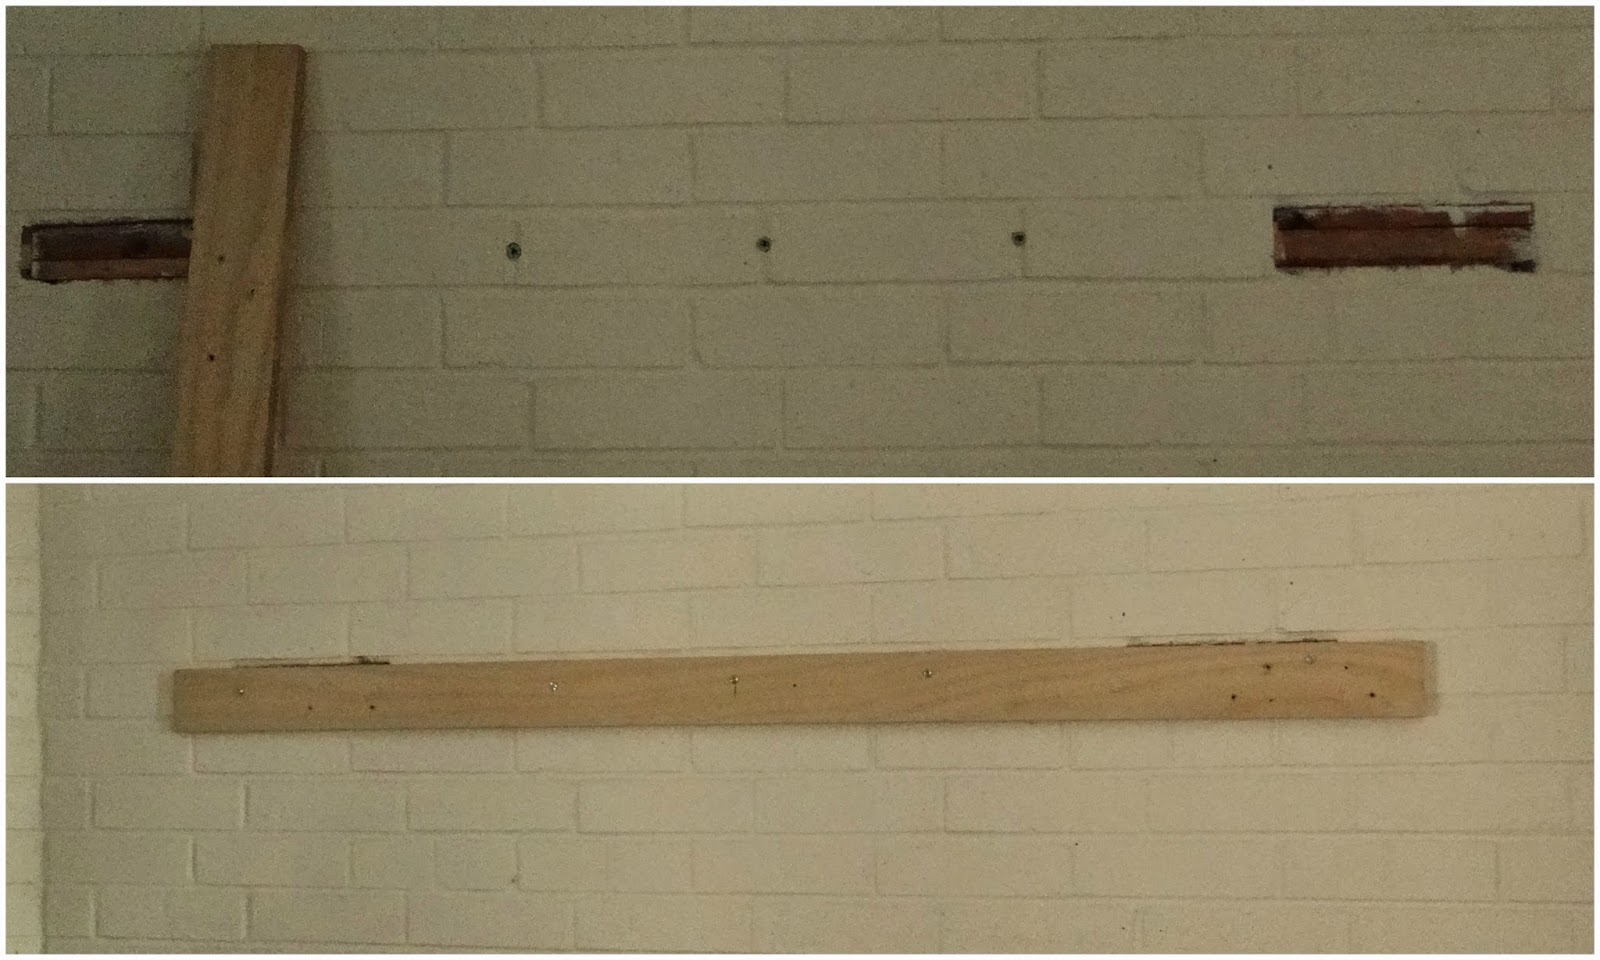
Screwing into the anchors and into the two pieces of wood on either end.  (That puppy ain’t goin nowhere!)
 
Then, we attached six 2″x4″x6″ pieces along the ledger board to help support some of the weight of the mantel.  
 
attaching a floating mantel to brick
 
You can see that we really weren’t concerned about them being spaced exactly even – no one is going to see them remember.
 
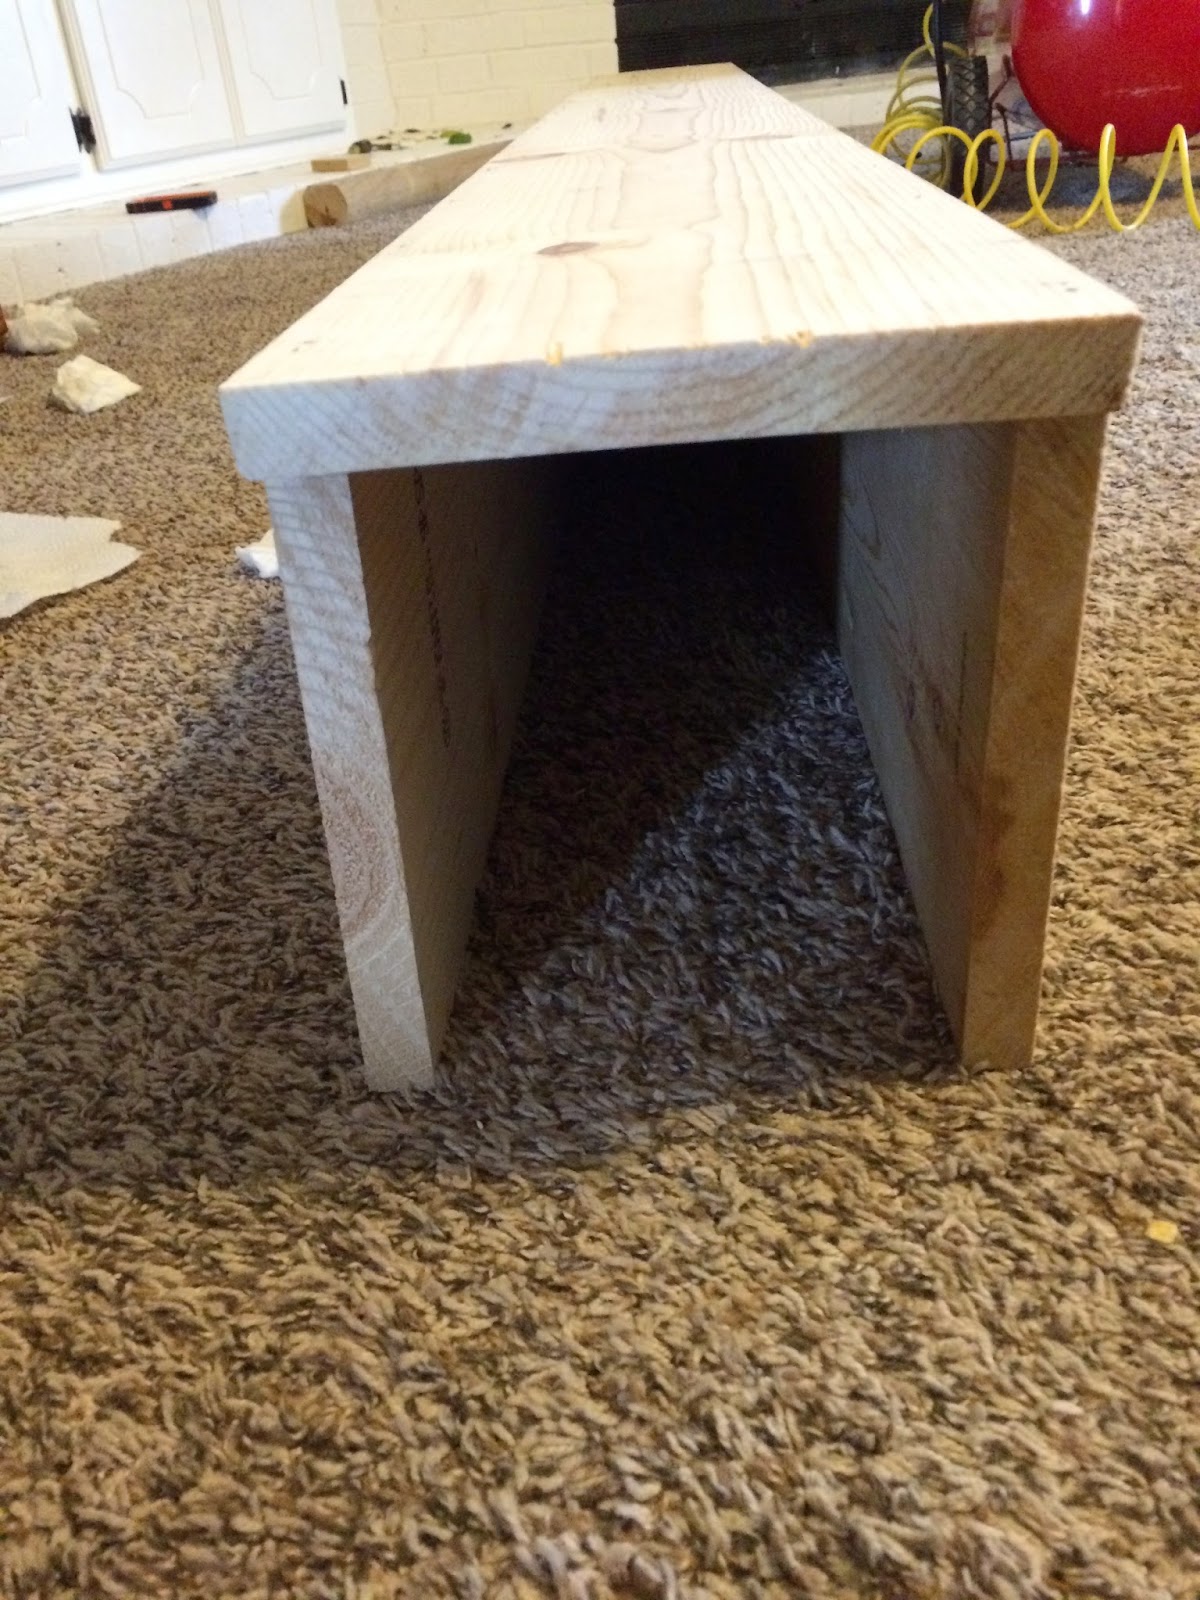
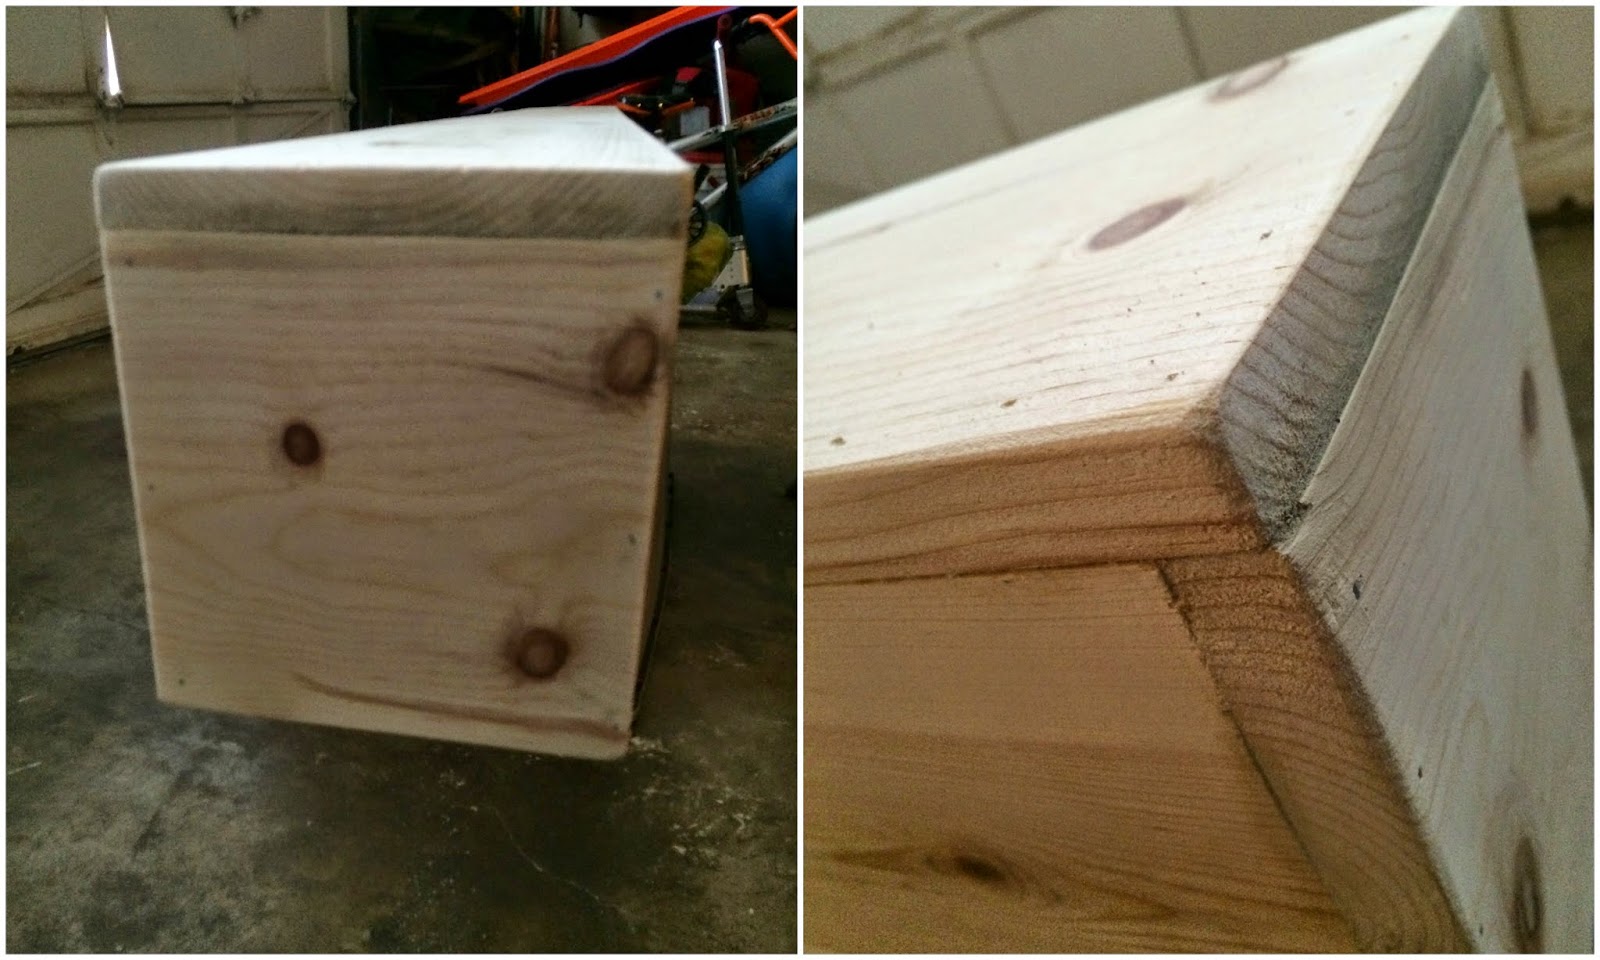
Then we moved on to building the actually mantel piece.  You are building a box that is missing one side.  
 
how to build a floating mantel
 
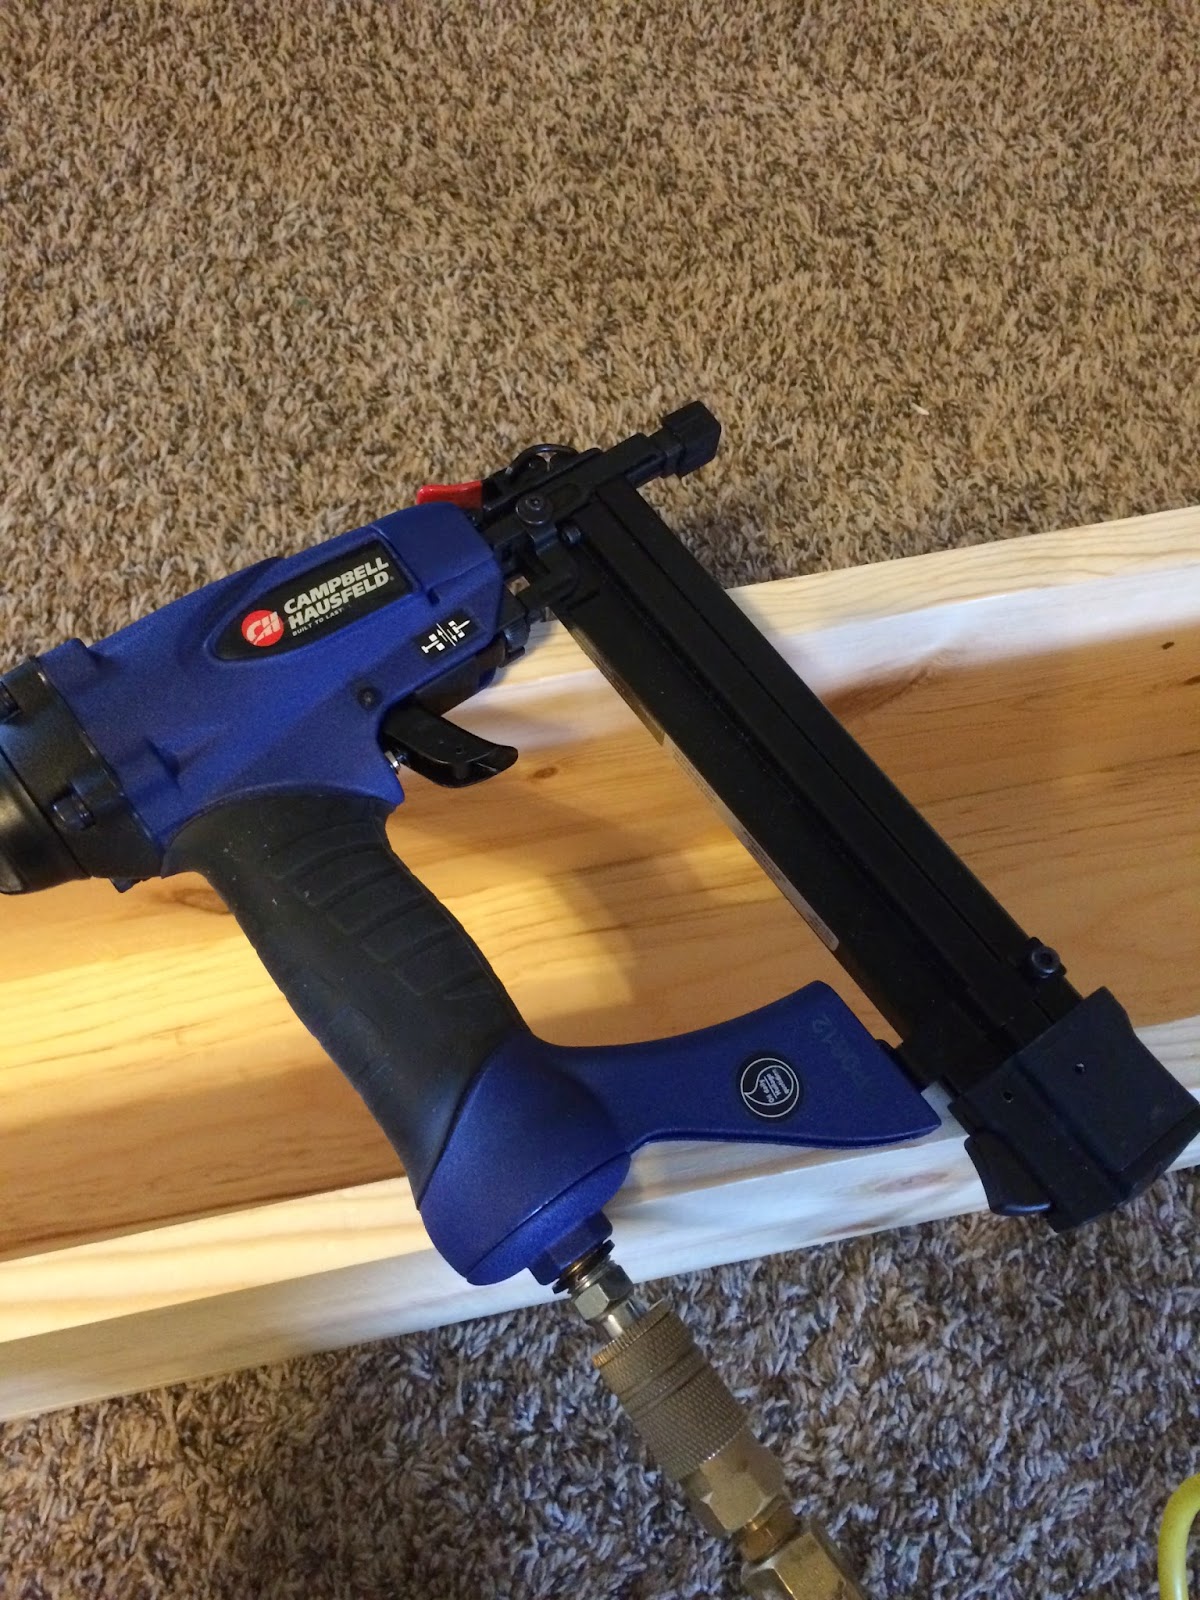
We used 1″x8″ pieces of basic white board for this.  This is the same wood that I used in our entryway.  I wanted some character to the wood since I was staining it, so this was a great economical choice.  I used two 6′ pieces and one 8′ piece which cost me around $25.  
 
This was my first time to use my nail gun, and man did it make this project easier!! Each joint was glued and nailed to make sure it was secure. 
 
building a floating mantel
 
In an effort to have as few cut end pieces showing as possible, I did this.  
 
how to DIY a floating mantel
 
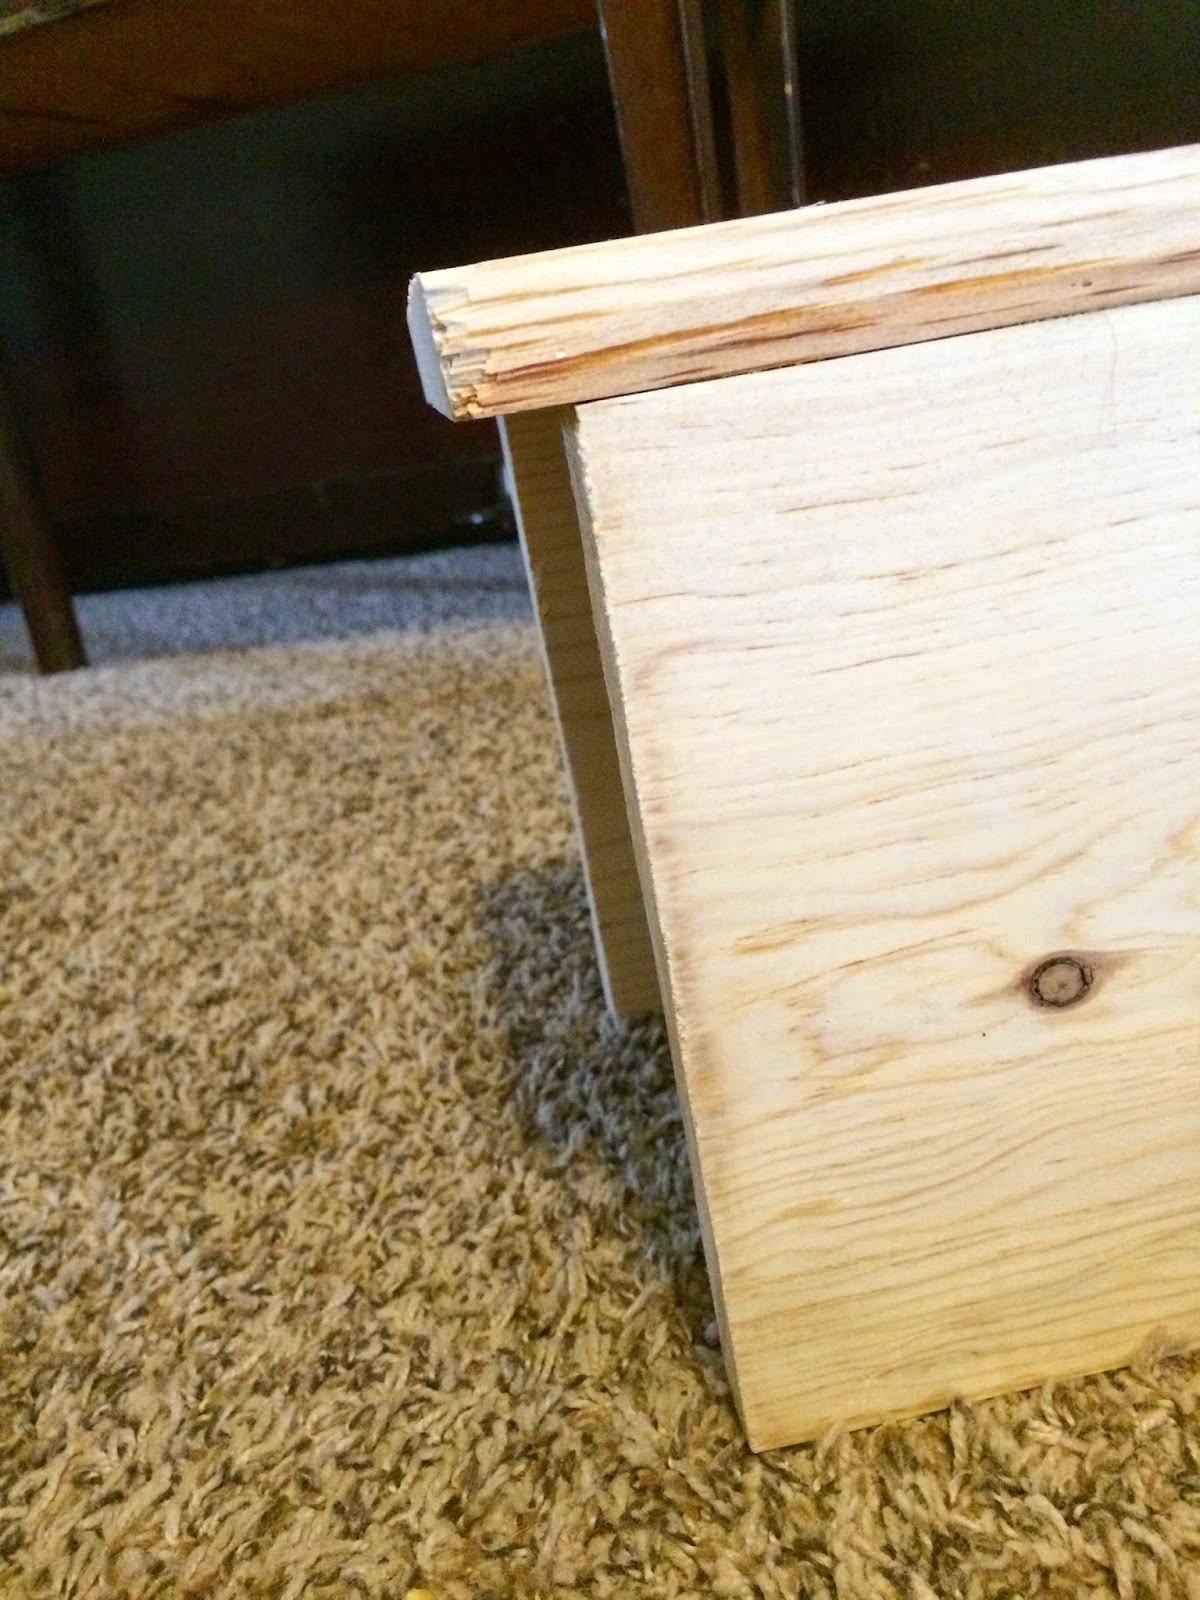
The two side pieces (which are actually the top and bottom) were cut shorter to accommodate the end pieces (the width of the wood shorter on each end).  
 
building a floating mantel
 
This way, from the front and the ends – the most visible parts, there is only one end of the board showing.  Clear as mud right? I hope so!! Here is the dry run before staining :).
 
floating mantel installed
 
I filled a few tiny gaps with stainable wood filler, and everything got a good sanding.  I smoothed all the edges and corners really good.  Then I stained it with a dark walnut stain, and topped it off with a couple of coats of polyurethane.  
 
floating wood mantel
 
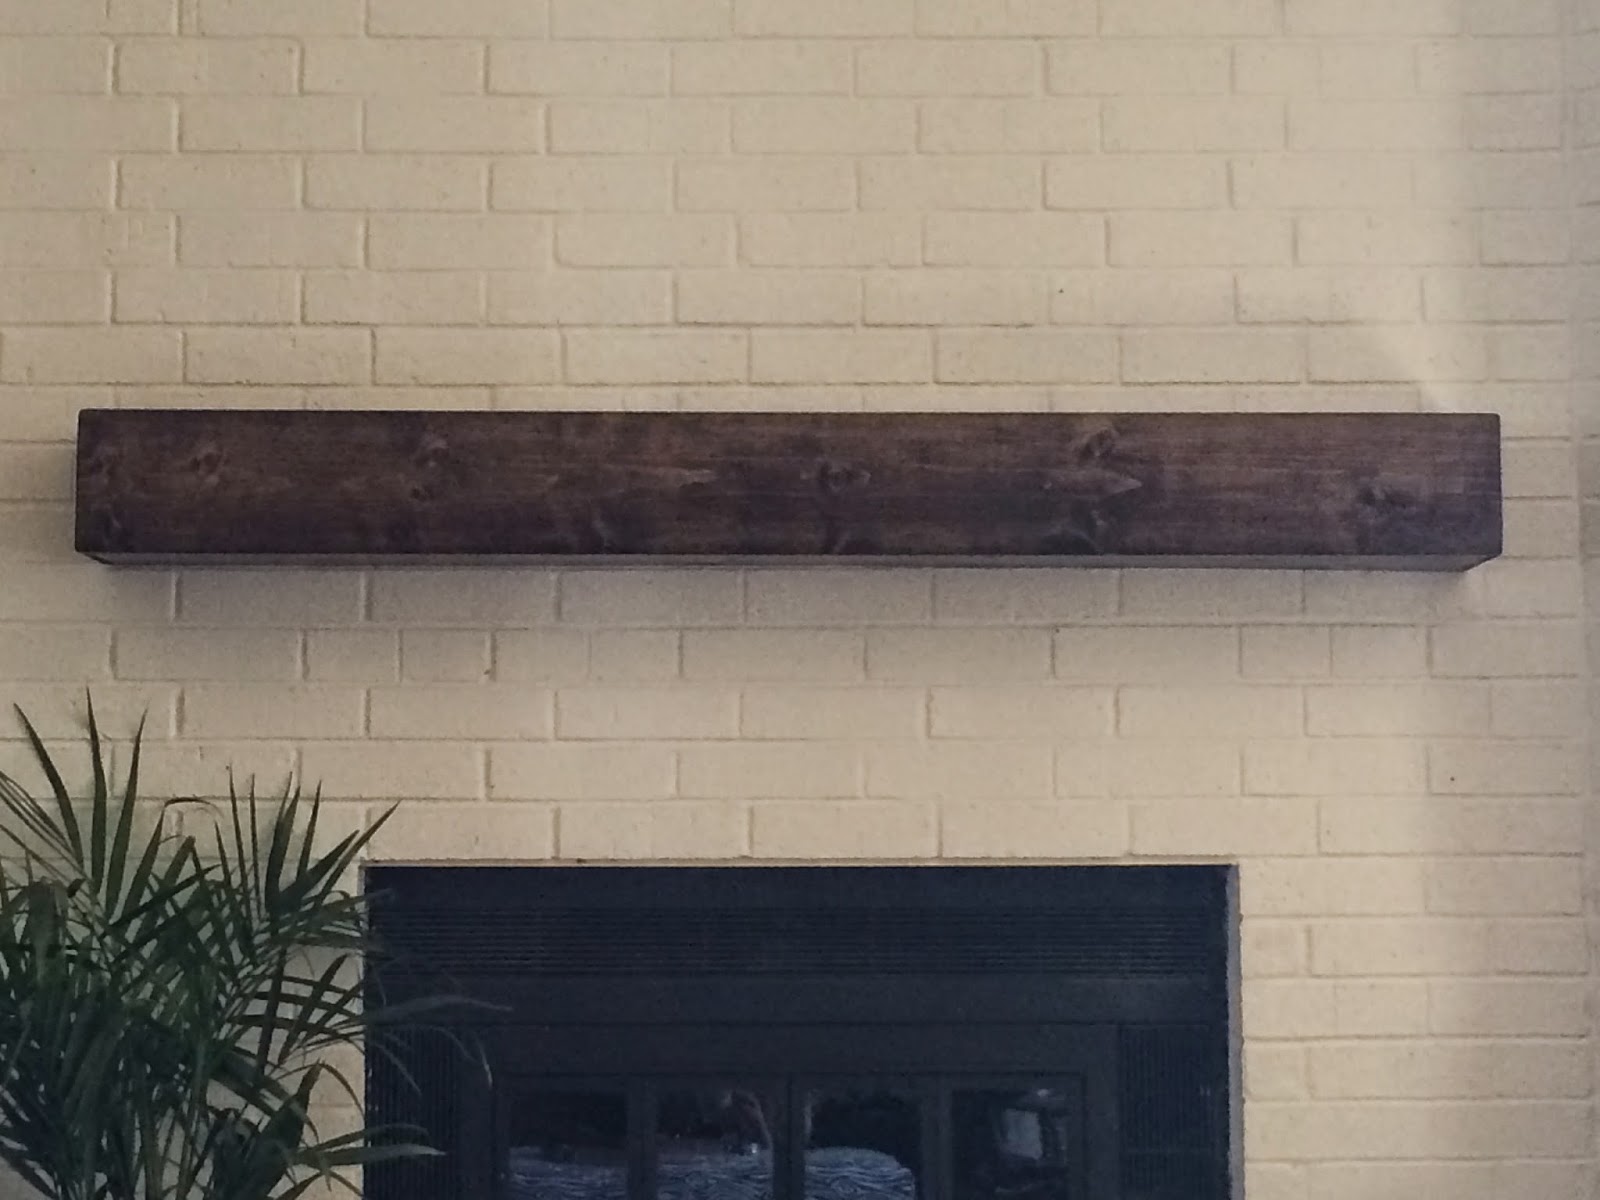
Hanging it was super easy!  Slip it over the supports, and attach the mantel to the ledger board with screws.  We made our ledger shorter than the actual mantel to allow room to adjust the placement of the mantel when we were mounting it, which was very helpful to get the desired placement.
 
I snapped this shot right after we finished hanging it.  Such sweet satisfaction to DIY!!
 
updated fireplace with painted brick and floating mantel
 
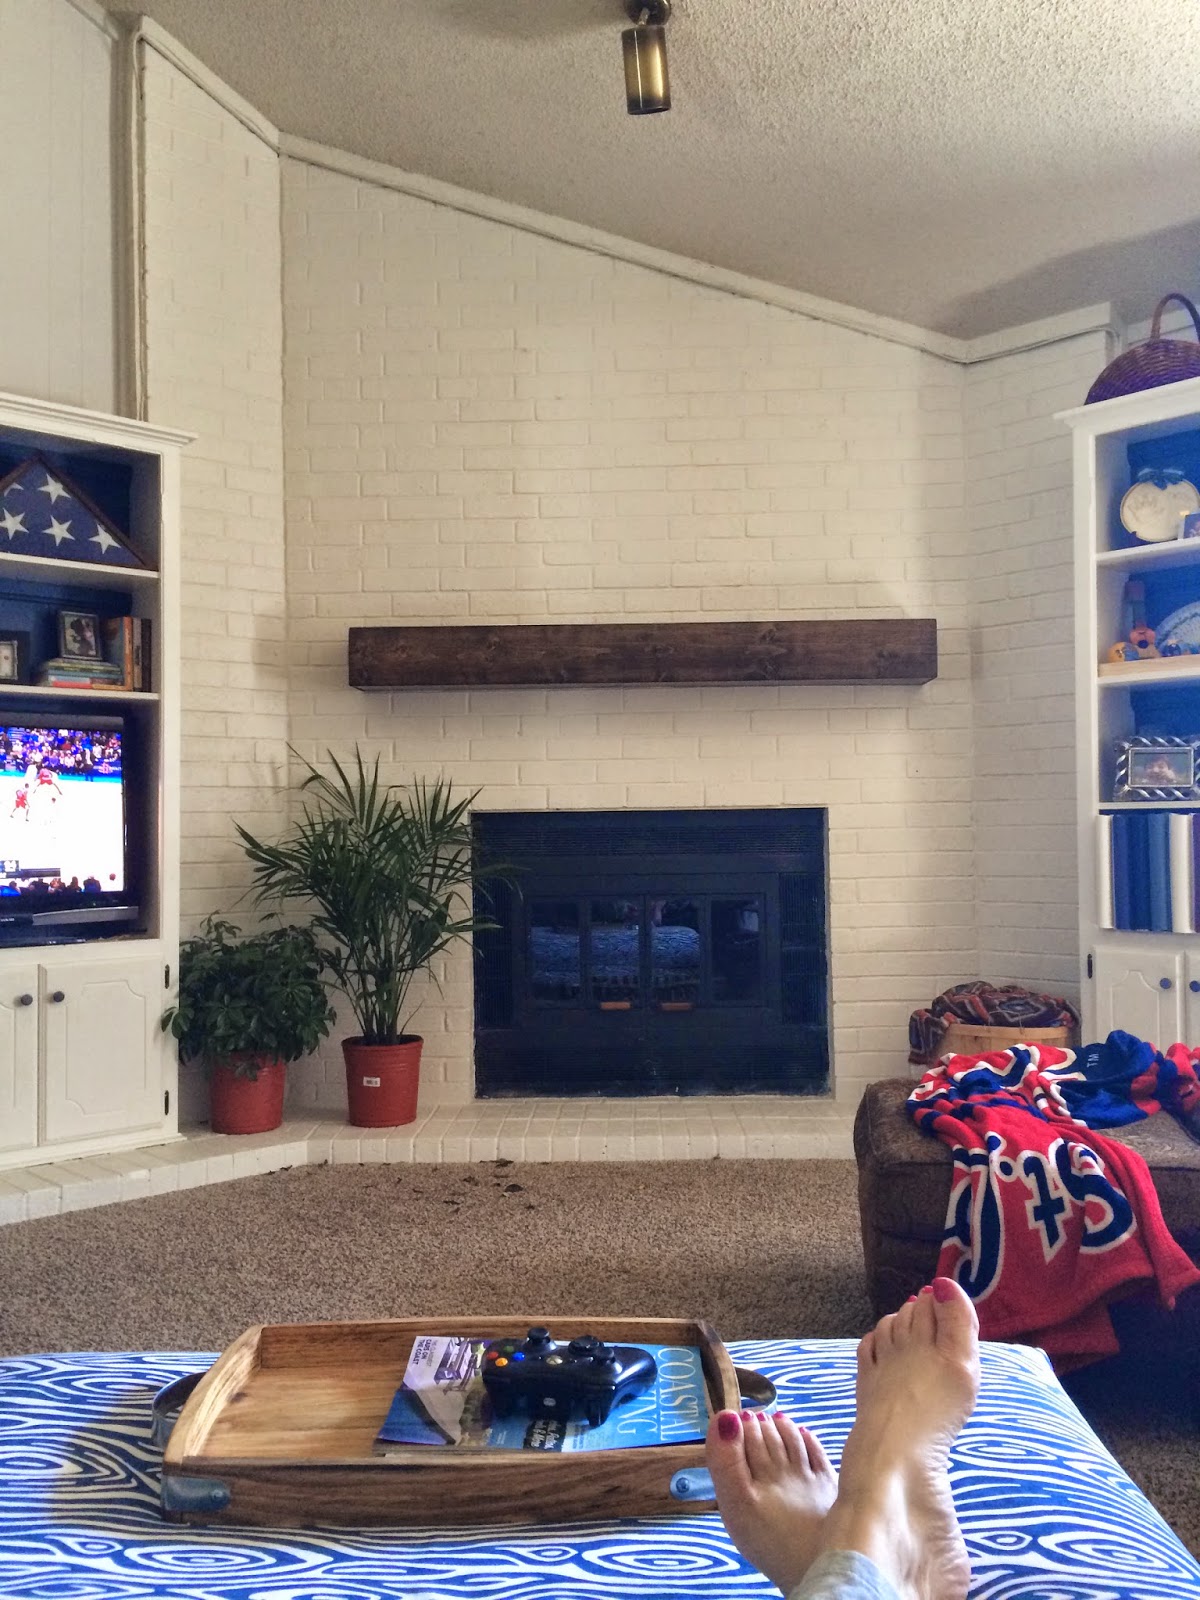
Loving the finished product and can’t wait to get it styled up for spring!!
 
family room
 
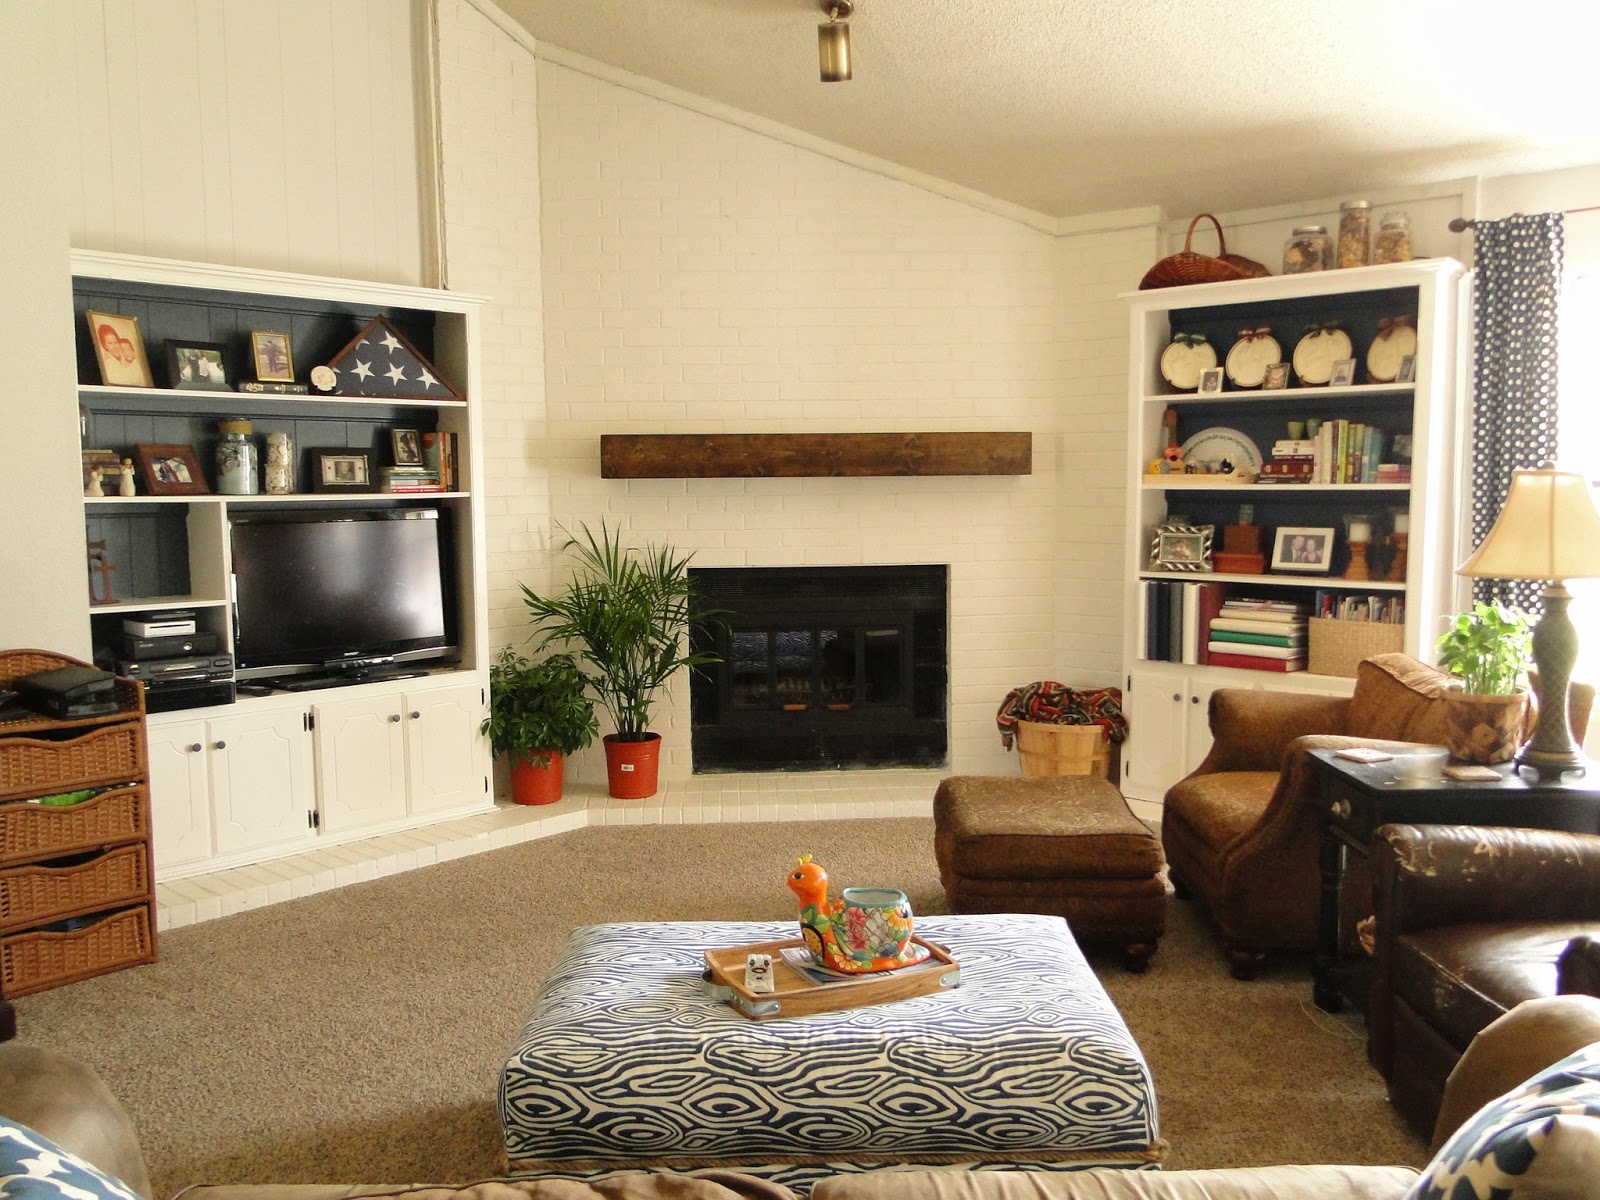
Our family room is coming along.  It really is feeling more and more like a space I want to stay a while.  And, that’s a nice feeling.  

 photo Blessingssignature_zps514a1303.png

 photo Namesignature_zpsd15d2f6d.png

Linking up with Best DIY Project of 2015 Contest / TDC April Before and After / Best of the Nest / Inspiration2 Link Party / Thrifty Thursday / The Creative Circle / March Pretty Preppy Party / Frugal Friday / Link Party Palooza / That DIY Party / Share Your Creativity / Something to Talk About
Previous Post: « How to ‘Slipcover’ An Ottoman
Next Post: Easter Mantel »

Reader Interactions

Comments

  1. Paige Rose says

    March 19, 2015 at 11:17 pm

    Looks so nice!!! I love the color of the fireplace too!!

    Paige.Rose

    From
    http://www.TheQuaintSanctuary.blogspot.com

    Reply
    • Tara says

      August 20, 2021 at 3:52 pm

      I’m so glad I stumbled across this post. The advice to leave an overhang (the width of the boards) in order to easily accommodate the end pieces is so smart! I’ve read numerous tutorials, & for those who do not make miter cuts, their method is unnecessarily difficult & doesn’t look as nice! I can’t believe I could find no other that did this. Thanks, again!

      Reply
      • frazzledjoy says

        October 11, 2021 at 10:38 am

        Glad this was helpful!!

        Reply
  2. Megan Taylor says

    March 20, 2015 at 2:11 pm

    Love the new mantel! Looks really good with the white brick. Great job!

    Reply
  3. Angela at Simply Beautiful By Angela says

    March 20, 2015 at 3:50 pm

    Looks fantastic!! 🙂

    Reply
  4. Decor To Adore says

    March 21, 2015 at 8:40 pm

    What a timely post! We need a new mantle and yours is just wonderful. Thank you for the lovely inspiration. Have a wonderful weekend.

    Reply
  5. Karen @ karensuponthehill says

    March 22, 2015 at 11:37 pm

    I love this! I love the stain & the rustic look. Well done!
    I would love for you to stop by my blog tomorrow and join our Something to Talk About link party!
    Have a great week!
    Karen

    Reply
  6. On Being Bianca ... says

    March 24, 2015 at 6:00 pm

    Love it! I did some floating shelves in my basement with a similar design as this – yours turned out great! Thanks for sharing over at the Pretty Preppy Party! xx, b @ being-blanca.com

    Reply
  7. Lisa @ Shine Your Light says

    March 29, 2015 at 2:38 pm

    Denise yes yes yes yes! Your new mantle looks so awesome!! I love it!! The stain on it against the brick, the rustic and simple design, love love love!!!!! And great tutorial. We have a similar mantle but it is painted white and it runs all the way across our built ins too. I need to tweak it in some way and now you've got me thinking about stripping and staining. Hmmm. Well enjoy all your work in here because your room is looking fabulous my friend! (Love the ottoman fabric too!)

    Reply
  8. pam {simple details} says

    March 29, 2015 at 4:26 pm

    Denise, that turned out fabulous!! At first glance I thought it was a rustic old beam! Your family room transformation is coming together so nicely, wonderful job! Thanks for sharing at Best of the Nest!

    Reply
  9. John Richard Grimley says

    October 10, 2021 at 6:17 pm

    Purely because I’m a belt & braces kinda guy, those six 2″x4″x6″ pieces you screwed to the ledger board, I would’ve screwed them on first, drill, glue and 4″ screws

    Reply
    • frazzledjoy says

      December 15, 2021 at 7:02 pm

      You are not wrong. That definitely would have been easier and if I were building it now I would probably do that. This was one of our first DIY builds so we were winging it just a bit :). But, the mantel has held strong all these years with zero issue!

      Reply

Leave a Reply Cancel reply

Your email address will not be published. Required fields are marked *

Recipe Rating


This site uses Akismet to reduce spam. Learn how your comment data is processed.

Primary Sidebar

Welcome

Hey friend!! I'm so glad you stopped by today!! I am married to the love of my life and I have been blessed with four amazing kids. My life is kinda crazy some days and I feel frazzled often. But, Jesus brings me JOY each and everyday in the little things. I love everything home decor, DIY, and crafts!!
Read More…

Categories

Archives

Copyright

I share to inspire!! Please feel free to use and share my ideas!! I simply ask that you give credit back to my site and add a link back to my blog if you reference one of my projects, or photos. Thank you so much!!

Recent Posts

  • Empty Nesting, My Thoughts
  • Kitchen Cabinet Facelift
  • Just Popping In To Say “HI”
  • Knock, Knock….Anyone There?
  • Easter Tablescape 2022
  • CONTACT ME
  • DISCLOSURES

Footer

Hubby and I took a little trip to Colorado Springs Hubby and I took a little trip to Colorado Springs and had the best time! ❤️ We took off as the sun was rising in OKC and landed in the mountains! 🥰 It was so good to get away together! We hit all the high points (pun intended haha) - Royal Gorge, Pikes Peak, Garden of the Gods, and Seven Bridges. We hiked everyday! Can’t wait for our next adventure!! 🥰
.
#emptynestingrocks #travel #marriage #emptynesterlife❤️
31 years with my favorite! So thankful for you! ❤️❤️ #marriage #anniversary #growingoldtogether
Our baby graduated from college last night!! From Our baby graduated from college last night!! From our alma mater! 🧡🖤 We are feeling beyond blessed and are so loving this stage of parenting! Watching our adult kids live life well is truly remarkable! God has big plans for you Gavin and we can’t wait to watch him work in and through you! Love you!
Happy Resurrection Day!! He is risen!! Happy Resurrection Day!! He is risen!!
Haven’t shared something from my house in months Haven’t shared something from my house in months! Just refreshed our mantle for spring and I love it! So happy that Oklahoma’s weather has finally chilled out and become more springy! ☀️🌸🌺
.
#homedecor #ourhome #spring #springismyfavorite #springdecor
One month of being Gigi and Pops to this precious One month of being Gigi and Pops to this precious little blessing!! 💕 We love you so much Blair!!
Five more sleeps! ❤️🎄 Nothing better than t Five more sleeps! ❤️🎄 Nothing better than twinkle lights on a Christmas tree ✨☺️ Looking forward to all the family festivities over the next few days. Merry Christmas to you all!! 
.
#christmas #christmastree #christmasdecor #christmaslights #merrychristmas
32 years ago today I made one of the best decision 32 years ago today I made one of the best decisions of my life when I said “yes” to marrying this guy. We celebrated our 30th anniversary back in May! We’ve experienced a lot over the years but there’s no one I would rather be doing life with! @vangreenwood you’re my favorite!! ❤️❤️
.
#marriage #proposalanniversary #youremyfavorite
I really enjoyed decorating my new kitchen shelves I really enjoyed decorating my new kitchen shelves for Christmas! What’s your favorite spot to decorate? I really like to spread out Christmas décor throughout the house! 🎄❤️
.
#homedecor #christmasdecor #christmas #itsbeginningtolookalotlikechristmas #favoritetimeofyear
Follow on Instagram

Copyright © 2025 · Captivating Theme on Genesis Framework · WordPress · Log in